Create a simple name validator function in Angular

In any Angular application working with validators is a trivial part of the development process. You might need to write a validator function for a form control which can vary from simple validation, like, check if username is valid or not, to more complex validations, like, check if entered ip address is of ipv4 or ipv6!!.

In this blog post I will show you how to get started by writing one simple userName validator function and assign this validator function to your form control in the form group and yes we will use reactive forms.

First let’s create the validator function.

import { AbstractControl } from '@angular/forms';

export function validateName(fieldName = 'name', displayName = 'Name') {
    return (control: AbstractControl) => {
        const value = control.value;
        if (value == null) {
            return null;
        }
        if (value.length < 1) {
            return { [fieldName]: `${displayName} is required` };
        }
        if (!isValidName(value)) {
            return { [fieldName]: `You must enter a valid ${displayName}` };
        }
        return null;
    };
}

export function isValidName(value: string) {
    const pattern = /^[a-zA-Z\d_.]*$/;
    return pattern.exec(value) !== null;
}

Above validator function validates if the entered value is valid or not by using a RegExp to test the entered value. We allow only string values and also allow only two special chars, i.e, _ (underscore) and . (dot). And also, as you can see above validator function returns the error messages that we want to display on the template below the userName form control. Isn’t this nice?.

Now let’s create the form control and assign above validator function.

this.form = this._fb.group({
     userName: ['', validateName('userName', 'Username')]
});

If you look at above code closely, you can see we are using the form builder service to generate the form control.

Lastly lets look at our form and form control in the template.

<form
    class="row g-3"
    novalidate
    [formGroup]="form"
    [class.was-validated]="isFormSubmitted"
    (ngSubmit)="onFormSubmit($event)"
>
    <div class="col-md-4">
        <label for="userName" class="form-label">First name</label>
        <input
            type="text"
            class="form-control"
            id="userName"
            formControlName="userName"
            required
            [ngClass]="{
                'is-invalid':
                    isFormSubmitted && form.controls['userName'].errors
            }"
        />
        <div
            class="invalid-feedback"
            *ngIf="form.controls['userName'].hasError('userName')"
        >
            {{ form.controls['userName'].errors?.userName }}
        </div>
    </div>
</form>

I think this is it. We have created a simple userName validator.

Checkout the Github repo for more code samples.

Export table PDF in Angular with JSPDF.

In this post we have seen how to install the jspdf library in an Angular project and export a simple PDF.

Here we will see how we can create a table (with table like data) with jspdf APIs with real data and export to PDF.

Lets say we want to export below table data in UI to PDF.

Table

And the data for above table is maybe fetched from API call or computed in UI, but lets say we have the data, like, below in an array variable.

monthlyPayments = [
   {
      "Month":"1",
      "Interest":"3,666.67",
      "Principal":"7,829.36",
      "Balance":"792,170.64"
   },
   {
      "Month":"2",
      "Interest":"3,630.78",
      "Principal":"7,865.25",
      "Balance":"784,305.39"
   },
   {
      "Month":"3",
      "Interest":"3,594.73",
      "Principal":"7,901.3",
      "Balance":"776,404.09"
   },
   {
      "Month":"4",
      "Interest":"3,558.52",
      "Principal":"7,937.51",
      "Balance":"768,466.58"
   },
   {
      "Month":"5",
      "Interest":"3,522.14",
      "Principal":"7,973.89",
      "Balance":"760,492.69"
   },
   {
      "Month":"6",
      "Interest":"3,485.59",
      "Principal":"8,010.44",
      "Balance":"752,482.25"
   },
   {
      "Month":"7",
      "Interest":"3,448.88",
      "Principal":"8,047.15",
      "Balance":"744,435.1"
   },
   {
      "Month":"8",
      "Interest":"3,411.99",
      "Principal":"8,084.04",
      "Balance":"736,351.06"
   },
   {
      "Month":"9",
      "Interest":"3,374.94",
      "Principal":"8,121.09",
      "Balance":"728,229.97"
   },
   {
      "Month":"10",
      "Interest":"3,337.72",
      "Principal":"8,158.31",
      "Balance":"720,071.66"
   }
   ...
]

Now lets use the table function from jspdf library and also use above table data to create the PDF and export it.

exportToPDF() {
        // Creating a unique file name for my PDF
        const fileName = 'table.pdf';
        const doc = new jsPDF();
        doc.setFont('helvetica', 'normal');
        doc.setFontSize(14);
        doc.table(
            10,
            95,
            this.monthlyPayments,
            this._createHeadersForPdfTable([
                'Month',
                'Interest',
                'Principal',
                'Balance',
            ]),
            { autoSize: false }
        );
        doc.save(fileName);
    }

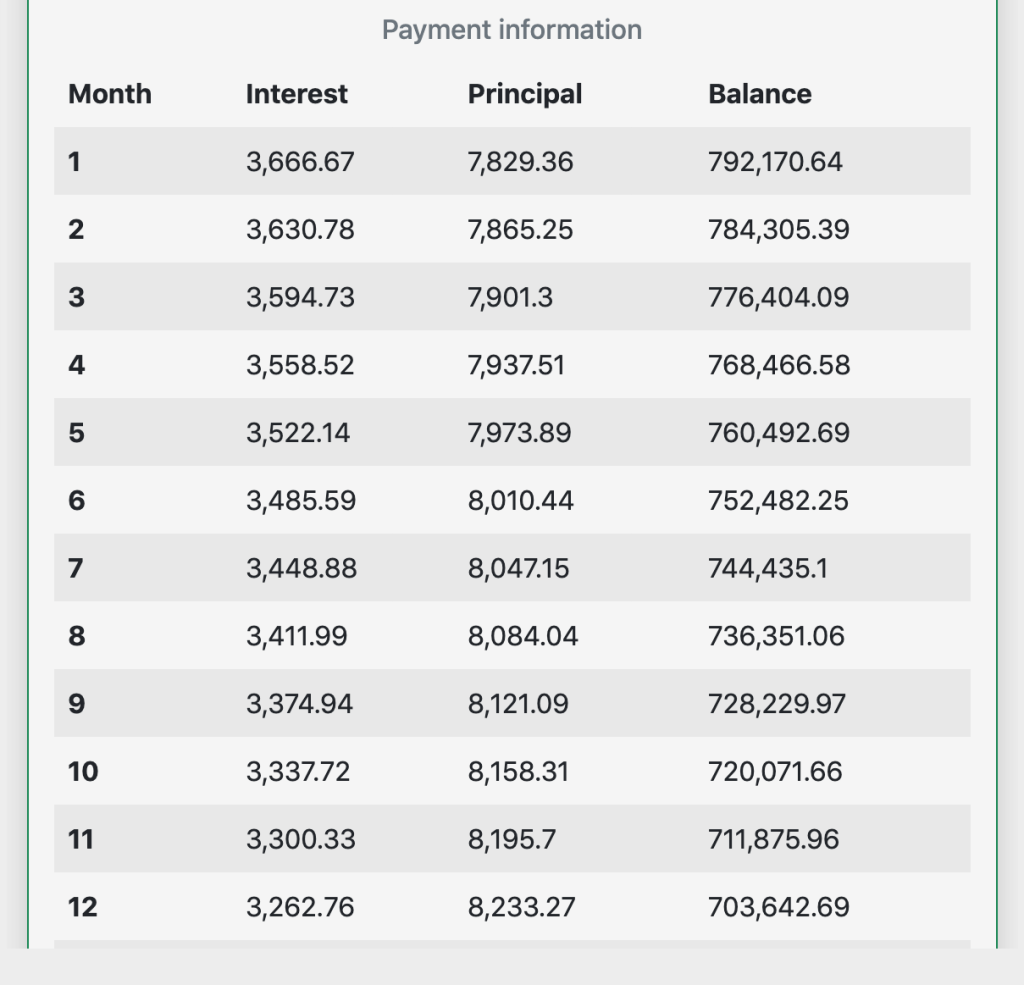
When we call above function we should see the pdf exported with our sample table data.

And the function _createHeadersForPdfTable is a simple utility function used to create the headers for our table. See below.

private _createHeadersForPdfTable(keys: string[]) {
        const result: CellConfig[] = [];
        for (let i = 0; i < keys.length; i += 1) {
            result.push({
                name: keys[i],
                prompt: keys[i],
                width: 55,
                align: 'center',
                padding: 10,
            });
        }
        return result;
    }

Note: If you have observed the table data, all the numbers in the array variable monthlyPayments are all converted to strings, this was done intentionally. For some reason only strings are working. Might be a bug in jspdf!!.

Conclusion
  • We have see sample table data that we wanted to export to PDF.
  • We have used the table method from jspdf library to create the PDF.
  • We have successfully exported our table data to PDF.

Checkout complete code on Github.

Using FormArray in Angular with example.

In this blog post we will try to understand how a FormArray works. In simple words FormArray is simply a collection of form controls grouped together. So if a control in the FormArray is invalid then entire array is invalid. And a form control in the array can be FormControl or FormGroup.

In order to understand FormArray we should first understand FormGroup and FormControl. So, I would suggest reading about these.

Let’s get right into the post.

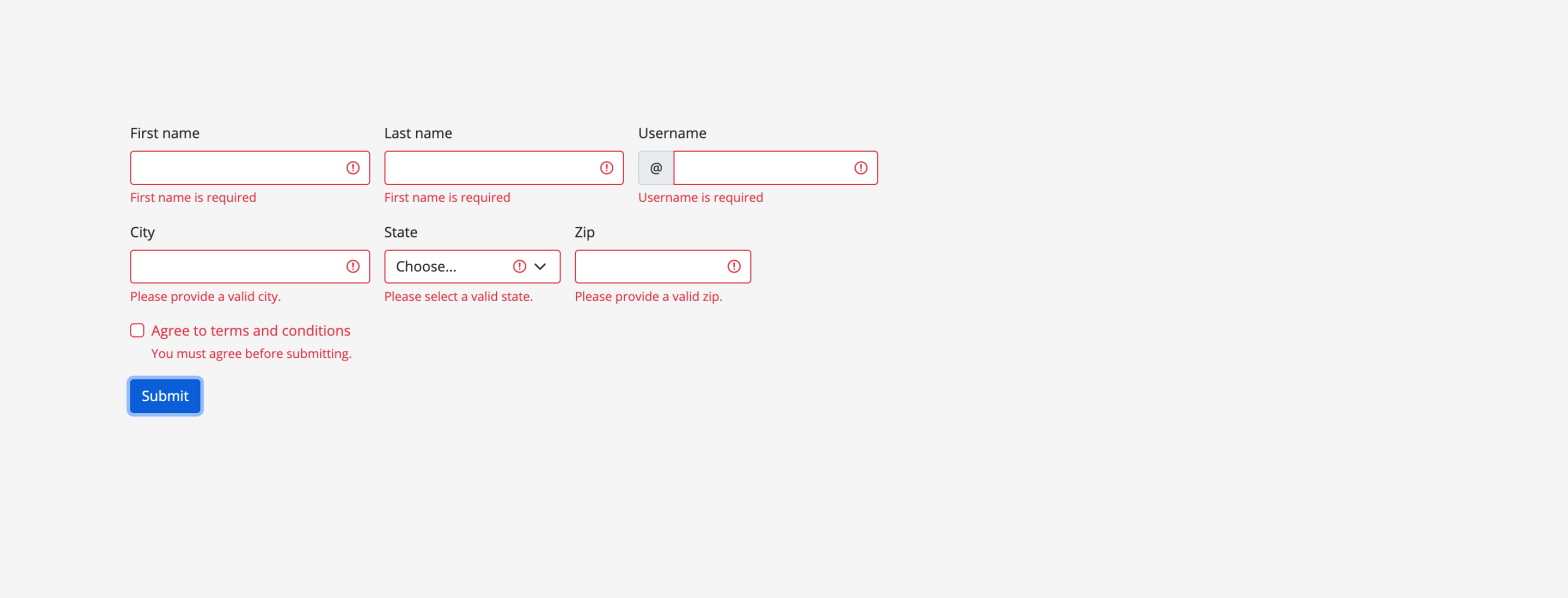
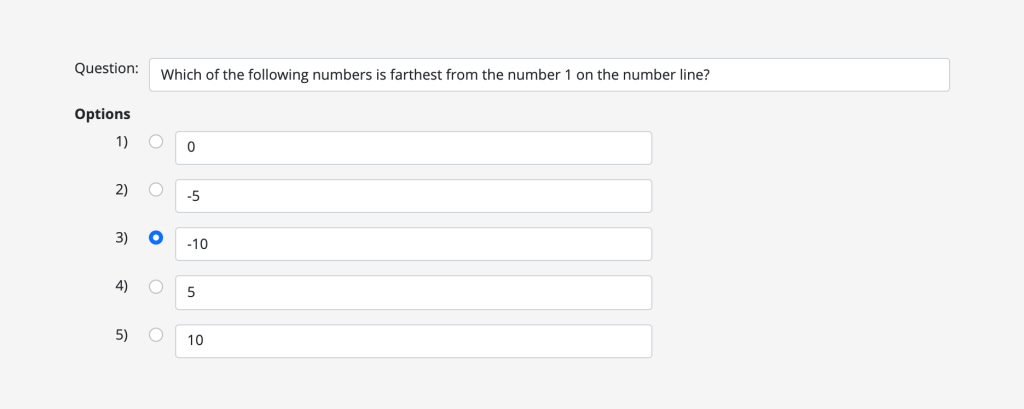
Assume we have a requirement to create a form like below.

Question and options

This is a question and answer type of form. And answer is actually multiple radio buttons selection. So, we have two type of controls:

  1. Input text element for question and answers.
  2. Radio buttons for selecting the correct option in our answers.

First, lets start by creating or building our form model form, like below.

this.form = this._fb.group({
            question: ['', Validators.required],
            options: this._fb.array([]),
        });

Above form group has one field / control called question for our Question input and another field / control options for our options or answers defined as a form array (this._fb.array([])). **If you’ve noticed we are working with reactive-forms which is the best way to work with dynamic controls.

An array usually comes with few methods through which we can manipulate our array. Same for FormArray too, it has few methods. Like, push to add new controls to form array.

Now lets look at some code where we can add controls to our form array options field defined above.

const options = this.form.get('options') as FormArray;
const option = new FormGroup({
      selected: new FormControl(),
      answer: new FormControl('', [Validators.required]),
});
options.push(option);

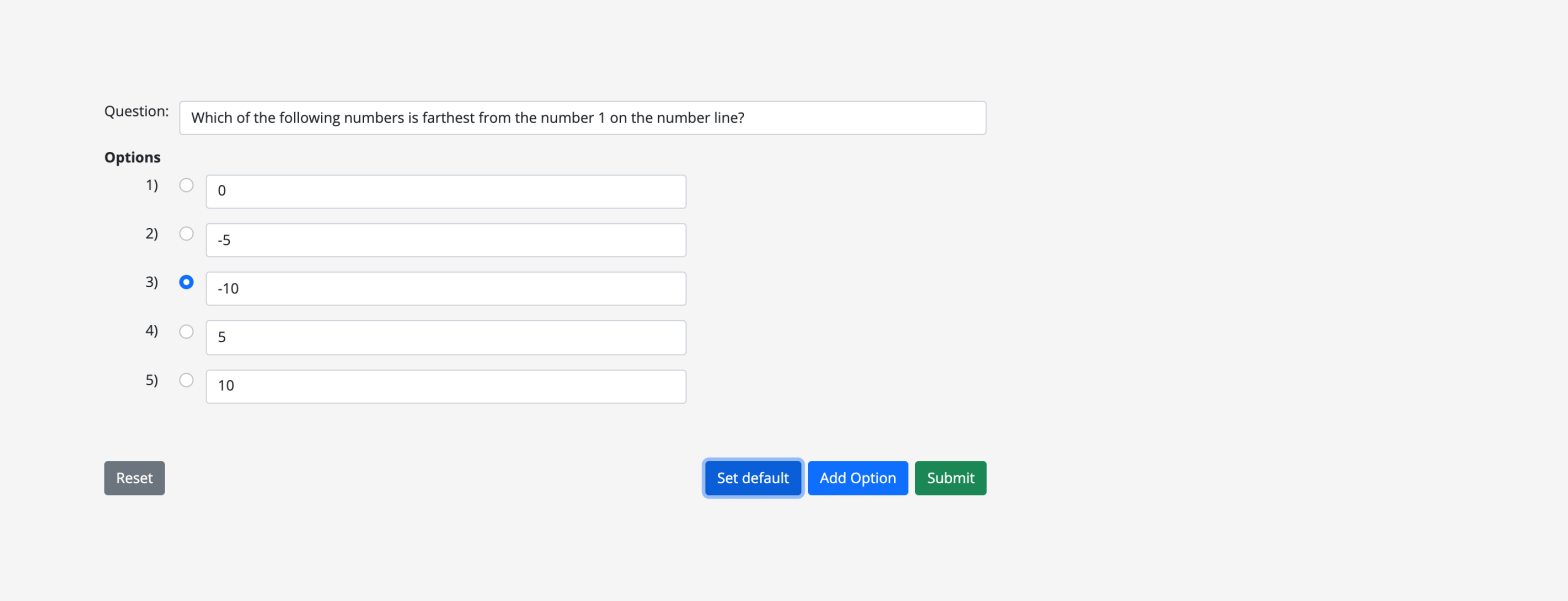
In above code sample we are creating a new form group with two controls {selected, answer} for each of our option and adding them to ours options form array. So, selected form control is actually a radio button for user to select the correct answer and answer is input text element to display the answer. Finally using push method to add our new form control to the form array. Likewise, we can add multiple options to our form array and create the options like in the screenshot.

Now we have created our form with the needed controls in them.

Lets look at another scenario. Say, we get our question data from API call and we want to populate our form with this data, for this we could write a simple function like below.

setDefault(data = DEFAULT_DATA) {
    const { question, options } = this.form.controls;
    question.setValue(data.question);
    const selectedOption = (this.selectedOption = data.answer);
    this.isOptionSelected = true;
    (options as FormArray).clear();
    data.options.forEach((item) => {
       const option = new FormGroup({
            selected: new FormControl(),
            answer: new FormControl(item, [Validators.required]),
        });
        (options as FormArray).push(option);
    });
    (options as FormArray).controls[selectedOption]
        .get('selected')
        ?.setValue('selected' + selectedOption);
}

Take a minute to debug above code. In above code line no. 14-16 shows you how we are selecting the correct radio button answer in the array of options.

And our data from API call is like below.

const DEFAULT_DATA = {
    question:
        'Which of the following numbers is farthest from the number 1 on the number line?',
    options: ['0', '-5', '-10', '5', '10'],
    answer: 2,
};

Lastly lets look at our form template.

<form
    class="needs-validation data-container question-answer-form"
    [formGroup]="form"
>
    <div class="row pb-3">
        <div class="col-md-1 text-end">Question:</div>
        <div class="col-md-11">
            <input
                type="text"
                class="form-control"
                id="question"
                placeholder="Enter question"
                formControlName="question"
                [ngClass]="{
                    'is-invalid':
                        isFormSubmitted && form.controls['question'].errors
                }"
                required
            />
            <div
                class="invalid-feedback"
                *ngIf="form.controls['question'].errors?.required"
            >
                Question cannot be empty
            </div>
        </div>
    </div>
    <h6
        class="fw-bold"
        *ngIf="optionsFormArray && optionsFormArray.controls.length > 0"
    >
        Options
    </h6>
    <div
        class="row pb-3"
        formArrayName="options"
        *ngFor="let option of optionsFormArray.controls; let i = index"
    >
        <ng-container [formGroupName]="i">
            <div class="col-md-1 text-end">{{ i + 1 }})</div>
            <div class="col-md-8">
                <div class="row">
                    <div class="col-md-2 radio-clm">
                        <input
                            class="form-check-input"
                            type="radio"
                            id="selected{{ i }}"
                            value="selected{{ i }}"
                            formControlName="selected"
                            name="selected"
                            (click)="optionClicked(i)"
                        />
                    </div>
                    <div class="col-md-10">
                        <input
                            type="text"
                            class="form-control"
                            formControlName="answer"
                            maxlength="255"
                            placeholder="Enter option text"
                        />
                        <div
                            *ngIf="
                                getOptionsFormGroup(i).controls['answer']
                                    .touched &&
                                !getOptionsFormGroup(i).controls['answer'].valid
                            "
                            class="row text-danger mb-3"
                        >
                            <div
                                class="col-md-12"
                                *ngIf="
                                    getOptionsFormGroup(i).controls['answer']
                                        .errors?.required
                                "
                            >
                                Option is required
                            </div>
                        </div>
                    </div>
                </div>
            </div>
        </ng-container>
    </div>
</form>

In the above template we can see we have initialised our form [formGroup]=”form” and defined our form controls by using the directive formControlName. We are also creating our controls in the form array dynamically by looping through it *ngFor=”let option of optionsFormArray.controls; let i = index” and define our form group [formGroupName]=”i” and again define controls in them.

That’s it, we have worked with Form and FormArray now!!.

Form and FormArray in action.

This is just a initial step towards creating more intuitive and complex forms in Angular. For example, there are still lot more methods in FormArray we can use, like to name a few:

  1. To remove all controls we can use method clear().
  2. To remove a control at a given index we can use method removeAt({}).
  3. Method insert({}) to add a control at a given index.

Checkout Github repo for complete code and also to see it in action.

Setup style linting in angular app.

We have already learned how to setup eslint and prettier in angular app. But this time we are going to setup style lint.

Check below link for quick reads.

stylelint.io

Lets get started, goto the angular project on the terminal and follow below steps.

Step 1

npm install --save-dev stylelint stylelint-config-sass-guidelines

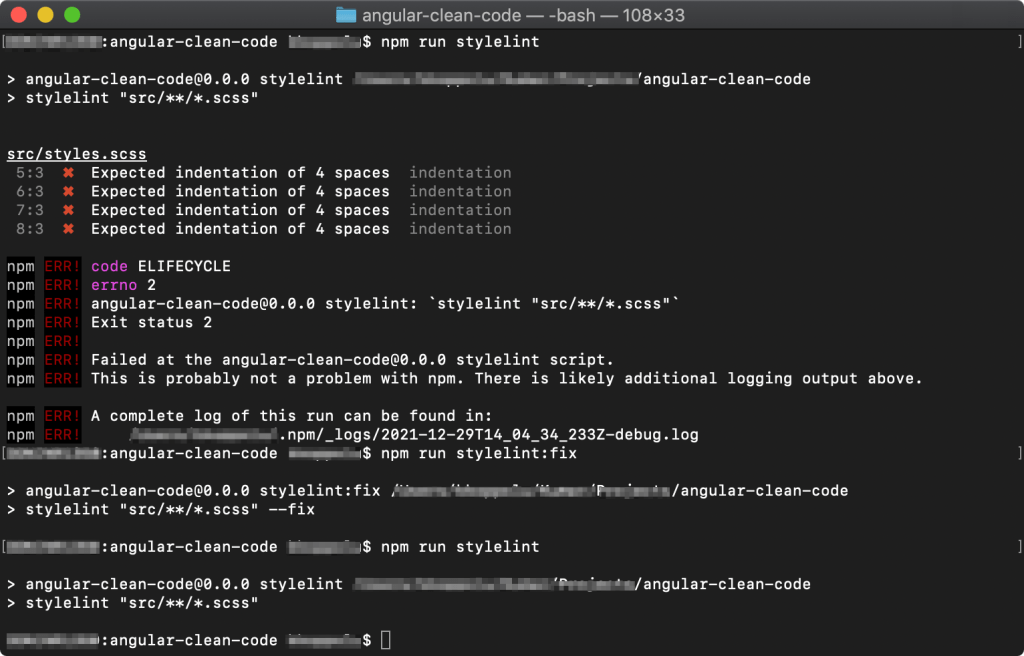
Above command installs the stylelint and stylelint linter config (plugin) based on sass guidelines. The style linter (stylelint-config-sass-guidelines) or plugin will make sure we are linting our styles based on the sass guidelines.

Step 2

Create .stylelintrc.json (config file for stylelint) at the root of the angular app and add below configs.

{
  "extends": "stylelint-config-sass-guidelines",
  "rules": {
    "indentation": 4,
    "max-nesting-depth": null,
    "selector-max-compound-selectors": null,
    "color-named": null,
    "order/properties-alphabetical-order": null,
    "shorthand-property-no-redundant-values": null,
    "selector-pseudo-element-no-unknown": [
      true,
      {
        "ignorePseudoElements": "ng-deep"
      }
    ],
    "selector-no-qualifying-type": null,
    "selector-class-pattern": null
  }
}

.stylelintrc.json contains all our style linting rules and we have added few basic rules. Please check link for complete details about the plugin and all the rules.

Style lint setup for the angular project is complete. Now lets add few scripts to package.json file to make life bit better.

"stylelint": "stylelint \"src/**/*.scss\"",
"stylelint:fix": "stylelint \"src/**/*.scss\" --fix"
Style linting

Above screenshot shows our new scripts at package.json in action.

Checkout Github Repo for the sample project.

Create a simple number formatter pipe in Angular.

There will come a time in any application where you would want to format a given number. Like, formatting number to comma separated strings or to currency strings.

For example, you would want to format number 1000000 to 1,000,000 or number 1234567 to 1,234,567. You get what I mean.

Now to do this the right way in Angular we can create a pipe service. Using pipe as template expression we can transform our strings. A pipe would take a input value, process it and return a transformed value.

import { Pipe, PipeTransform } from '@angular/core';

@Pipe({
    name: 'nf',
})
export class NumberFormatterPipe implements PipeTransform {
    transform(value: number | undefined): string {
        if (!value) {
            return '';
        }
        return value.toString(10).replace(/\d(?=(\d{3})+\.)/g, '$&,');
    }
}

Above is a pipe which would transform our numbers. See below code sample to use this in a template.

<div class="text-primary fw-bold">
    {{ 1234567 | nf }}
</div>

Be sure to add the pipe class to the declarations of your Angular module before you start using it.

Checkout the Github repo for the complete project where this pipe is being used.

Export PDF in Angular with JSPDF.

In this post we are going to create an Angular 12 application and export a PDF file using jspdf library.

jspdf is a very niche library to generate PDFs in JavaScript. We can create PDFs for various types of forms or documents, like, work-orders, reports, invoices…etc. Checkout their website for various functionalities like using third party tools, browser print methods. Once we create the PDF we can also download it on the client-side.

Let us start with creating new Angular project.

ng new angular-jspdf-example
cd angular-jspdf-example/

Next, let’s also install Bootstrap CSS framework to create our table UI.

npm install bootstrap

Adding Bootstrap to Angular project…Open styles.scss (I have created my Angular project using SCSS) and add below line to import the Bootstrap styles.

// Note: We are importing all the bootstrap styles but you wouldn't need that.
@import './node_modules/bootstrap/scss/bootstrap';

Install jspdf.

npm install jspdf

We now have our Angular project ready with all the needed dependencies. Run the application to check if all is good!!.

ng serve

Cool, we are now ready to add code for our PDF file. Open app.component.html (template) file and add below code.

<div class="row">
  <div class="col-md-12">
    <table class="table table-striped">
      <thead>
      <tr>
        <th scope="col">#</th>
        <th scope="col">First</th>
        <th scope="col">Last</th>
        <th scope="col">Handle</th>
      </tr>
      </thead>
      <tbody>
      <tr *ngFor="let item of users">
        <th scope="row">{{ item.uid }}</th>
        <td>{{ item.first }}</td>
        <td>{{ item.last }}</td>
        <td>{{ item.handle }}</td>
      </tr>
      </tbody>
    </table>
    <button type="button" class="btn btn-primary" (click)="exportDataToPDF()">Export to PDF</button>
  </div>
</div>

Here we have a table (Note: grid and table styles are from Bootstrap) to show our users data and a button to export this table data to our PDF file. And in the component class file we are going to define the users data and also declare exportDataToPDF function to export the data to our PDF file.

Declare Users data, like below.

users = [
  {
    uid: '1',
    first: 'Mark',
    last: 'Otto',
    handle: '@mdo'
  },
  {
    uid: '2',
    first: 'Jacob',
    last: 'Thornton',
    handle: '@fat'
  },
  {
    uid: '2',
    first: 'Larry the Bird',
    last: 'Thornton',
    handle: '@twitter'
  }
];

We are using jspdf library functions, so import jspdf.

import { CellConfig, jsPDF } from 'jspdf';

Declare the ‘Export to PDF‘ handler function and necessary functions to construct table data from jspdf library.

exportDataToPDF() {
  // Creating a unique file name for my PDF
  const fileName = this.title.replace(' ', '_') + '_' + Math.floor((Math.random() * 1000000) + 1) + '.pdf';
  // Default export is a4 paper, portrait, using millimeters for units
  const doc = new jsPDF();
  doc.setFontSize(20);
  doc.setFont('helvetica', 'bold');
  const titleXPos = (doc.internal.pageSize.getWidth() / 2) - (doc.getTextWidth(this.title) / 2);
  doc.text(this.title, titleXPos, 20);
  doc.setFont('helvetica', 'normal');
  doc.setFontSize(14);
  doc.table(10, 35, this._getDataForPdfTable(), this._createHeadersForPdfTable([
    'uid', 'first', 'last', 'handle'
  ]), { autoSize: false });
  doc.save(fileName);
}

private _createHeadersForPdfTable(keys: string[]) {
  const result: CellConfig[] = [];
  for (let i = 0; i < keys.length; i += 1) {
    result.push({
      name: keys[i],
      prompt: keys[i],
      width: 55,
      align: 'center',
      padding: 10
    });
  }
  return result;
}

private _getDataForPdfTable() {
  const data = [];
  for (let i = 0; i < this.users.length; i++) {
    data.push({
      uid: this.users[i].uid,
      first: this.users[i].first,
      last: this.users[i].last,
      handle: this.users[i].handle,
    });
  }
  return data;
}

Now if you click the button you should see the PDF file exported with data from the table in table fashion.

But let’s take a moment to understand above functions.

  • const doc = new jsPDF(); will create a document instance for the PDF so we can call the required functions from the library to create our PDF file.
  • We are using few functions like setFontSize(), setFont(), text(), table() from the jspdf library to create the PDF as in required format.
  • save() function will export the PDF file.
  • Checkout the website for more details about the parameters these functions need.
Conclusion
  • We are able to create Angular project and install jspdf.
  • We are able to create table using jspdf and export PDF file.
  • We are able to set title, set font size.. etc for our PDF file.

Checkout complete code on Github and enjoy the demo.

Versions

  • Angular – ~12.2.0
  • Bootstrap – ^5.1.3
  • jspdf – ^2.4.0

Angular form validation using Bootstrap.

Before proceeding I request readers to have working knowledge about Angular (web application framework), keep a sample Angular project ready and also have Bootstrap installed on the project!.

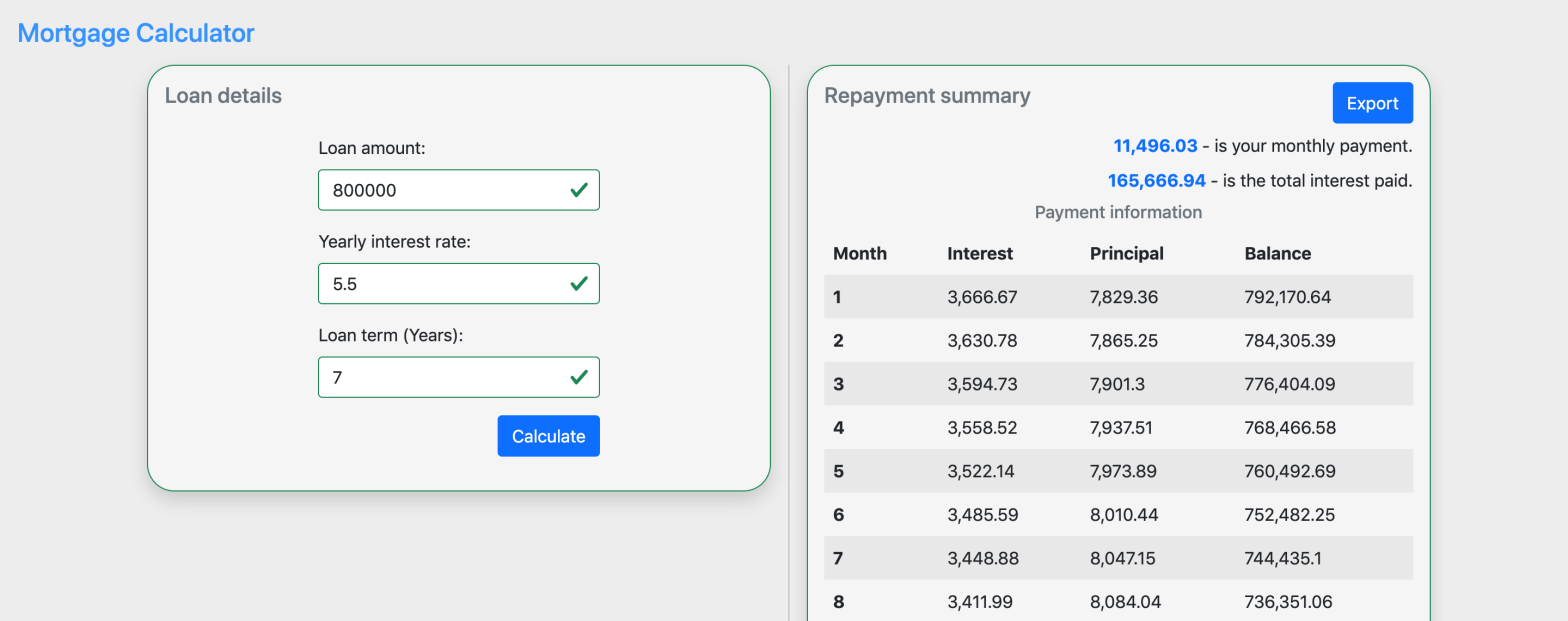
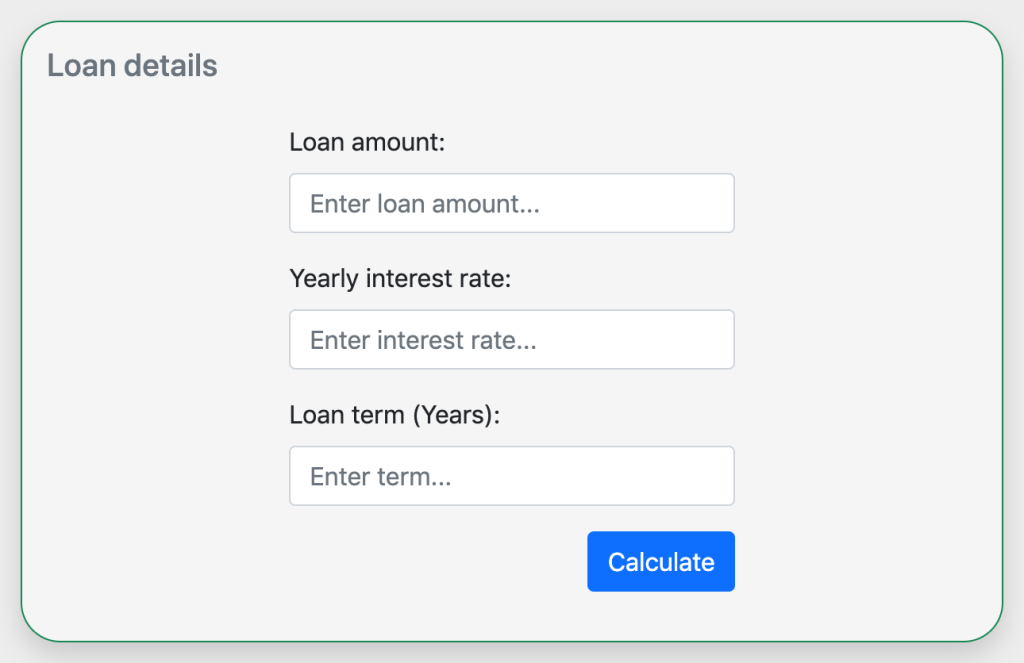
Now thats out of the way let us get started with post. Consider we have a form like below.

Loan details form

And our form in template file will look like below.

<form [formGroup]="form">
    <h5 class="text-secondary">Loan details</h5>
    <div class="row py-3">
        <div class="col-md-3"></div>
        <div class="col-md-6">
            <div class="mb-3">
                <label for="loanAmount" class="form-label">Loan amount:</label>
                <input
                    type="text"
                    class="form-control"
                    id="loanAmount"
                    placeholder="Enter loan amount..."
                    formControlName="loanAmount"
                    required/>
            </div>
            <div class="mb-3">
                <label for="interestRate" class="form-label">Yearly interest rate:</label>
                <input
                    type="text"
                    class="form-control"
                    id="interestRate"
                    placeholder="Enter interest rate..."
                    formControlName="interestRate"/>
            </div>
            <div class="mb-3">
                <label for="loanTerm" class="form-label">Loan term (Years):</label>
                <input
                    type="text"
                    class="form-control"
                    id="loanTerm"
                    placeholder="Enter term..."
                    formControlName="loanTerm"
                    required/>
            </div>
            <div class="col-12">
                <button
                    class="btn btn-primary float-end"
                    type="submit"
                    (click)="validateForm()">
                    Calculate
                </button>
            </div>
        </div>
        <div class="col-md-3"></div>
    </div>
</form>

If you notice, we are actually using Reactive forms in Angular rather than Template-driven forms because these are more flexible, you will see. Feel free to read about it. And don’t forget to import the modules FormsModule, ReactiveFormsModule.

We have few directives like formGroup to initialise the form , formControlName in inputs to register the controls to form and on button click we are calling a function to take action. So let’s initiate the form and declare the validateForm function.

// Declare form group
this.form = this._fb.group({
                loanAmount: [
                    '',
                    Validators.compose([
                        Validators.required,
                        Validators.pattern(INTEGER_REGEXP),
                    ]),
                ],
                interestRate: [
                    '',
                    Validators.compose([
                        Validators.required,
                        Validators.pattern(FLOATING_REGEXP),
                    ]),
                ],
                loanTerm: [
                    '',
                    Validators.compose([
                        Validators.required,
                        Validators.pattern(INTEGER_REGEXP),
                    ]),
                ],
                });
// On submit button handler. Maybe you need to calculate the loan...
validateForm() {
        // Flag to indicate if uses clicked the Calculate button.
        this.isFormSubmitted = true;
        if (this.form.valid) { 
           // Do the loan calculation
        }
}
// Integer regexp
export const INTEGER_REGEXP = /^[0-9]*$/;

We have declared the form, added the needed validators (using the reactive forms we are able to correctly validate the state of the form input) and declared the Calculate button click handler. Also, take note we have added a pattern validator to the inputs.

Now it’s time to add the validations to form template using Bootstrap. To achieve this we are going to use few CSS selectors from Bootstrap CSS framework and others.

  • was-validated – This selector is needed on the form tag itself if the form is submitted.
  • is-invalid – We need to add this selector to form input controls if the form is submitted and if there are errors on the control.
  • invalid-feedback – We can use this selector to show the error message below the input control.
  • required – This directive is needed on the input controls, indicating the controls are required to have a value.
  • isFormSubmitted – flag declared in component class to indicate if user clicked the Calculate button to validate the form.

Let us put all these selectors together and complete the form.

<form
    class="needs-validation"
    [formGroup]="form"
    [class.was-validated]="isFormSubmitted">
    <h5 class="text-secondary">Loan details</h5>
    <div class="row py-3">
        <div class="col-md-3"></div>
        <div class="col-md-6">
            <div class="mb-3">
                <label for="loanAmount" class="form-label">Loan amount:</label>
                <input
                    type="text"
                    class="form-control"
                    id="loanAmount"
                    placeholder="Enter loan amount..."
                    formControlName="loanAmount"
                    [ngClass]="{
                        'is-invalid':
                            isFormSubmitted &&
                            form.controls['loanAmount'].errors
                    }"
                    required/>
                <div
                    class="invalid-feedback"
                    *ngIf="form.controls['loanAmount'].errors?.required">
                    Loan amount cannot be empty
                </div>
                <div
                    class="invalid-feedback"
                    *ngIf="form.controls['loanAmount'].errors?.pattern">
                    Loan amount must be a positive integer
                </div>
            </div>
            <div class="mb-3">
                <label for="interestRate" class="form-label">Yearly interest rate:</label>
                <input
                    type="text"
                    class="form-control"
                    id="interestRate"
                    placeholder="Enter interest rate..."
                    formControlName="interestRate"
                    [ngClass]="{
                        'is-invalid':
                            isFormSubmitted &&
                            form.controls['interestRate'].errors
                    }"
                    required/>
                <div
                    class="invalid-feedback"
                    *ngIf="form.controls['interestRate'].errors?.required">
                    Interest rate cannot be empty
                </div>
                <div
                    class="invalid-feedback"
                    *ngIf="form.controls['interestRate'].errors?.pattern">
                    Interest rate must be a positive integer or decimal
                </div>
            </div>
            <div class="mb-3">
                <label for="loanTerm" class="form-label">Loan term (Years):</label>
                <input
                    type="text"
                    class="form-control"
                    id="loanTerm"
                    placeholder="Enter term..."
                    formControlName="loanTerm"
                    [ngClass]="{
                        'is-invalid':
                            isFormSubmitted && form.controls['loanTerm'].errors
                    }"
                    required/>
                <div
                    class="invalid-feedback"
                    *ngIf="form.controls['loanTerm'].errors?.required">
                    Loan term cannot be empty
                </div>
                <div
                    class="invalid-feedback"
                    *ngIf="form.controls['loanTerm'].errors?.pattern">
                    Loan term must be a positive integer
                </div>
            </div>
            <div class="col-12">
                <button
                    class="btn btn-primary float-end"
                    type="submit"
                    (click)="validateForm()">
                    Calculate
                </button>
            </div>
        </div>
        <div class="col-md-3"></div>
    </div>
</form>

Now we should have the validations working as expected. Test by clicking the Calculate button.

We are seeing the errors for inputs

Conclusion

We have completed the tutorial and we are able to achieve the following.

  • Create the form in Angular using reactive forms.
  • Implement Bootstrap in Angular and create form with Bootstrap.
  • Add validations to form and handle form submitted logic.

Check out full code at Github repo and enjoy the demo.

Versions:

  • Angular – 12
  • Bootstrap – 5

Create angular project in a specific version.

When we try to create a new angular project using the ng new command we get the angular project with version based on the global installed version of @angular/cli package.

So a quick fix here is to update the global @angular/cli package to latest version or which ever version you prefer so when you create a new angular project you get it with the required version.

npm uninstall -g @angular/cli
npm install -g @angular/cli@12.2.6

Using above commands we have updated our global @angular/cli version to 12.2.6. Now when you try to create a new angular project with ng new command you will get angular with version 12.2.6!!.

But what if you do not want to update the global @angular/cli version and still be able to create angular app with specific version (have your cake and eat it too). For this we can use npx command that executes npm package binaries.

First lets install npx globally.

npm install -g npx

Now we execute npx command with the -p parameter where we put a specific @angular/cli version. The last element of this statement is a command that creates an application on a specific @angular/cli version ng new [name of the project].

npx -p @angular/cli@12.2.6 ng new Angular12App

With above command we have a new angular project called Angular12App with version 12.2.0!!.

Below is the generated package.json content.

{
    "name": "angular12-app",
    "version": "0.0.0",
    "scripts": {
        "ng": "ng",
        "start": "ng serve",
        "build": "ng build",
        "watch": "ng build --watch --configuration development",
        "test": "ng test"
    },
    "private": true,
    "dependencies": {
        "@angular/animations": "~12.2.0",
        "@angular/common": "~12.2.0",
        "@angular/compiler": "~12.2.0",
        "@angular/core": "~12.2.0",
        "@angular/forms": "~12.2.0",
        "@angular/platform-browser": "~12.2.0",
        "@angular/platform-browser-dynamic": "~12.2.0",
        "@angular/router": "~12.2.0",
        "rxjs": "~6.6.0",
        "tslib": "^2.3.0",
        "zone.js": "~0.11.4"
    },
    "devDependencies": {
        "@angular-devkit/build-angular": "~12.2.6",
        "@angular/cli": "~12.2.6",
        "@angular/compiler-cli": "~12.2.0",
        "@types/jasmine": "~3.8.0",
        "@types/node": "^12.11.1",
        "jasmine-core": "~3.8.0",
        "karma": "~6.3.0",
        "karma-chrome-launcher": "~3.1.0",
        "karma-coverage": "~2.0.3",
        "karma-jasmine": "~4.0.0",
        "karma-jasmine-html-reporter": "~1.7.0",
        "prettier": "^2.4.1",
        "typescript": "~4.3.5"
    }
}

Conclusion

  • We learned how to create latest angular project by updating the global @angular/cli package to required version.
  • We have also learned to create latest angular project using npx.

Setup eslint and prettier in angular app.

Before we start with the steps to configure eslint and prettier I would encourage readers to spend sometime to know about these and why we need them. Check below links for the reads.

Lets start, goto the angular project on the terminal and follow below steps.

Step 1

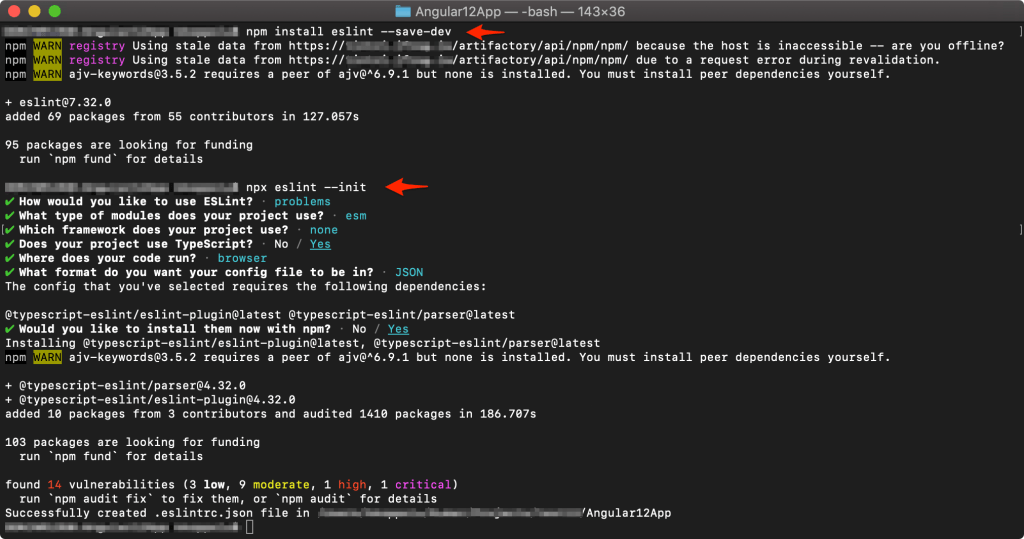
npm install eslint --save-dev

Above command installs the eslint dev-dependency for the project.

Step 2

npx eslint --init

Above command is going to configure the angular project with eslint. Creates the configuration file called .eslintrc.json. See below screenshot for the process.

Steps on terminal

Step 3

Now we need to add two eslint plugins to make it work with angular project and also make the right configuration for eslint and prettier so they do not clash with one another and work seamlessly.

npm install eslint-config-prettier eslint-plugin-prettier prettier --save-dev

Above command installs the two plugins and also installs prettier. Feel free to read about the two plugins. Add the plugin config to the eslint config file (.eslintrc.json).

"extends": [
        "eslint:recommended",
        "plugin:@typescript-eslint/recommended",
        "plugin:prettier/recommended"
    ],

Step 4

Create .prettierrc.json (config file for prettier) and add below code.

{
  "tabWidth": 4,
  "singleQuote": true,
  "trailingComma": "es5"
}

eslint and prettier setup is complete, now lets add few scripts to package.json.

"lint": "eslint .",
"lint:fix": "eslint --fix",
"format": "prettier --write './**/*.{js,jsx,ts,tsx,css,md,json,html}' --config ./.prettierrc.json"

Go ahead and try these commands…format script will parse the code, fixes eslint issues along with prettier so they do not conflict with each other, this is what we want right!!.

Few assumptions:

  • You are angular developer.
  • You are quite good at using node and npm.
  • You already have angular application ready to setup eslint and prettier.

Check out Github repo for complete code.

Restrict user from entering non-numeric inputs using a directive in Angular.

There must a requirement in any application to allow only entering numbers in text inputs. This can be solved by creating a directive with onKeydown event handler. And then adding this directive to input element. See below code sample.

import { Directive, HostListener } from '@angular/core';

@Directive({
  selector: '[allowNumbersOnly]'
})

export class AllowNumbersOnlyDirective {

  constructor() {}

  /**
   * On keydown event handler.
   * Here we check if the input is number or not, if not we just ignore the input.
   * @param {KeyboardEvent} $event
   * @return {boolean}
   */
  @HostListener('keydown', ['$event'])
  onKeydown($event: KeyboardEvent) {
    if (!$event) {
      return true;
    }
    return ($event.keyCode > 95 && $event.keyCode < 106)
        || ($event.keyCode > 47 && $event.keyCode < 58)
        || ($event.keyCode > 36 && $event.keyCode < 41)
        || $event.keyCode === 8;

  }
}

We add this directive to input element like below.

<input type="text" allowNumbersOnly class="form-control">

When user tries to enter value other than number we simple ignore the input.

Also don’t forget to add the directive AllowNumbersOnlyDirective to the module declarations.

Few reads: