Getting started with ChartIQ in Angular.

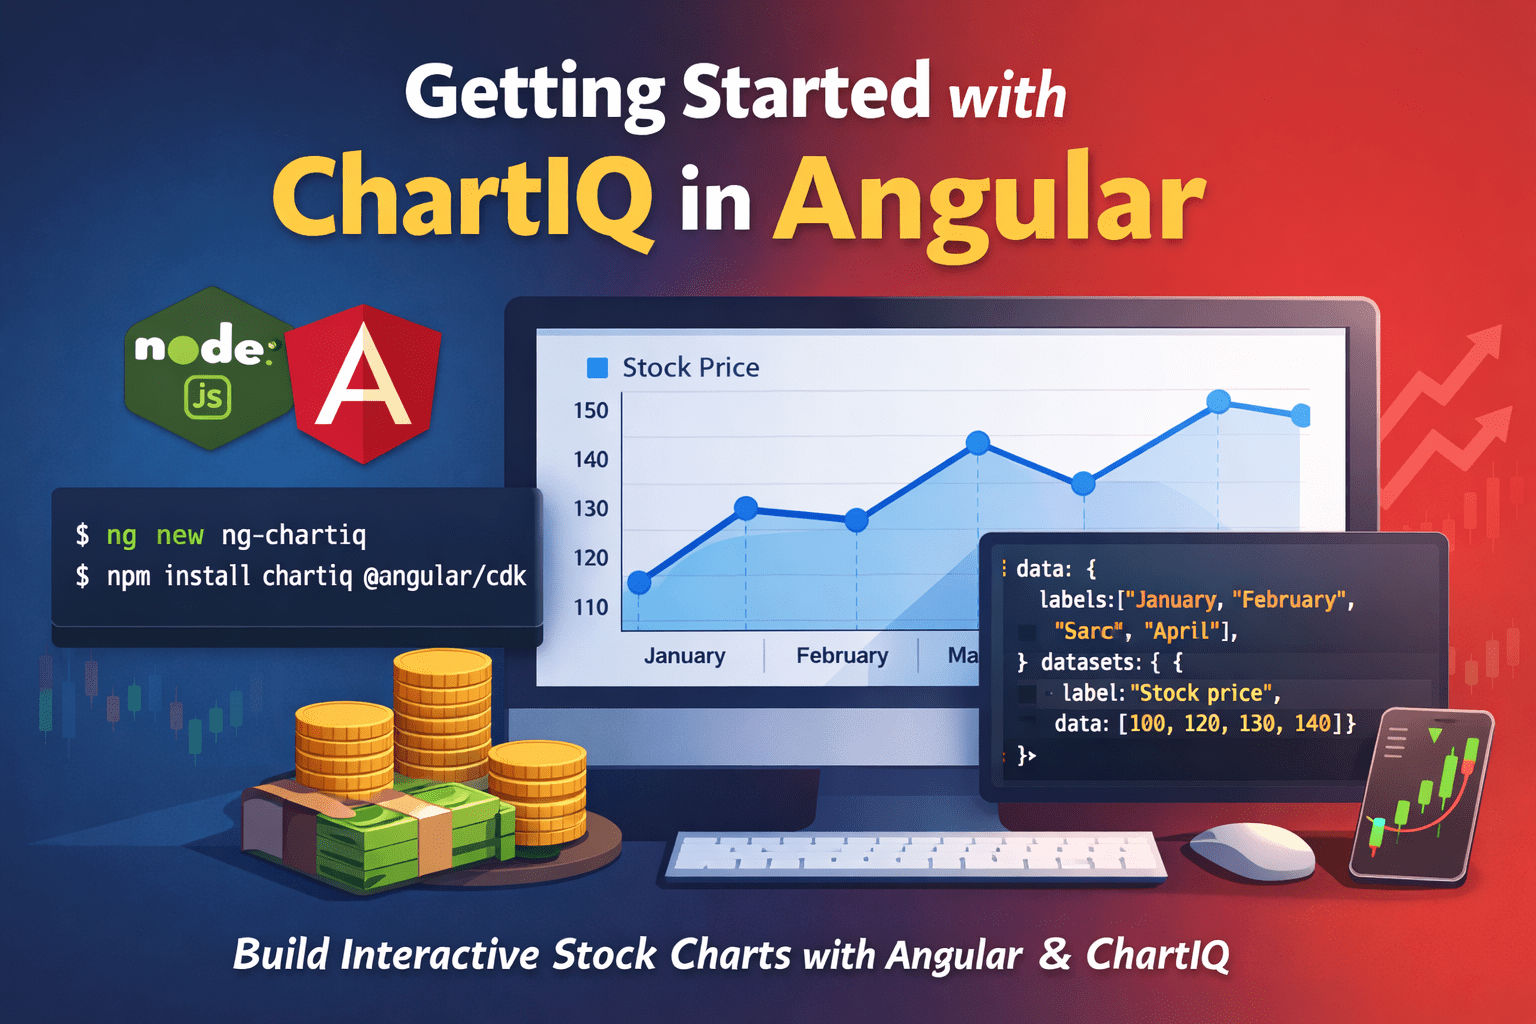
ChartIQ is a powerful and versatile charting library that allows you to create interactive financial charts for your web applications. In this tutorial, we will be using Angular to build a simple charting application that displays a line chart of stock price data.

Before we begin, you will need to have the following tools installed on your machine:

  • Node.js: This is a JavaScript runtime that is required to run Angular applications. You can download it from the official website at https://nodejs.org/.
  • Angular CLI: This is a command-line interface for Angular that makes it easy to create, build, and deploy Angular applications. You can install it by running the following command:
npm install -g @angular/cli

Once you have these tools installed, you are ready to start building your ChartIQ Angular application.

Step 1: Create a new Angular project

To create a new Angular project, open a terminal window and navigate to the directory where you want to store your project. Then, run the following command:

ng new ng-chartiq

This will create a new Angular project with the name ng-chartiq.

Step 2: Install ChartIQ and its dependencies

To use ChartIQ in your Angular application, you will need to install the ChartIQ library and its dependencies. Run the following command to install these packages:

npm install chartiq @angular/cdk @angular/animations
Step 3: Import ChartIQ and its dependencies in your Angular module

Next, you need to import the ChartIQ library and its dependencies in your Angular module. Open the file src/app/app.module.ts and add the following lines at the top:

import { BrowserModule } from '@angular/platform-browser';
import { NgModule } from '@angular/core';
import { CdkTableModule } from '@angular/cdk/table';
import { CdkTreeModule } from '@angular/cdk/tree';
import { MatTableModule } from '@angular/material/table';
import { MatTreeModule } from '@angular/material/tree';
import { BrowserAnimationsModule } from '@angular/platform-browser/animations';
import { ChartModule } from 'chartiq/js/chart';

Then, add the imported modules to the imports array of the NgModule decorator like this:

@NgModule({
  declarations: [
    AppComponent
  ],
  imports: [
    BrowserModule,
    CdkTableModule,
    CdkTreeModule,
    MatTableModule,
    MatTreeModule,
    BrowserAnimationsModule,
    ChartModule
  ],
  providers: [],
  bootstrap: [AppComponent]
})
export class AppModule { }
Step 4: Create a component for your chart

Now that you have ChartIQ set up in your Angular project, you can create a component to display your chart. Run the following command to generate a new component:

ng generate component chart

This will create a new component with the name chart in the src/app/chart directory.

Step 5: Display your chart in the component

To display your chart in the component, you will need to do the following:

In the src/app/chart directory, open the file chart.component.html and add an element with an ID attribute that will be used to reference the chart in your code. For example:

<div id="chartContainer"></div>

In the src/app/chart directory, open the file chart.component.ts and import the ChartIQ library at the top of the file:

import { Chart } from 'chartiq/js/chart';

In the ngOnInit lifecycle hook of the component, create a new instance of the Chart class and pass it the ID of the element where you want to display the chart. You can also specify the chart type, data, and other options in this step:

ngOnInit() {
  const chart = new Chart('chartContainer', {
    type: 'line',
    data: {
      // your data here
    },
    options: {
      // your options here
    }
  });
}

You can then use the chart instance to manipulate the chart, such as adding or updating data, changing the appearance, or responding to events.
I hope this helps you get started with ChartIQ in Angular! Please let me know if you have any questions or if you would like more information.

Step 6: Add data to the chart

To add data to the chart in the Angular component, you will need to specify the data in the data option of the Chart class when you create the chart instance. The data option should be an object with two properties: labels and datasets.

The labels property is an array of strings that represent the labels for each data point. For example, if you are charting stock prices over time, the labels could be the dates.

The datasets property is an array of objects that represent the data sets for the chart. Each object should have a label property that describes the data set, as well as a data property that is an array of numbers representing the data points.

Here is an example of how you could add data to the chart in the ngOnInit lifecycle hook of the component:

ngOnInit() {
  const chart = new Chart('chartContainer', {
    type: 'line',
    data: {
      labels: ['January', 'February', 'March', 'April'],
      datasets: [
        {
          label: 'Stock price',
          data: [100, 120, 130, 140]
        }
      ]
    },
    options: {
      // your options here
    }
  });
}

This would create a line chart with four data points, representing the stock price in January, February, March, and April. The data points would be plotted on the chart along the X-axis (time) and the Y-axis (price).

I hope this helps somebody!, drop a comment if any questions.

Conclusion:
  • We have created a sample angular project using ChartIQ.
  • We have added sample data to the chart.

How to use RxJS effectively in Angular for reactive programming

Introduction to Reactive Programming and RxJS

Reactive programming is a paradigm that allows developers to build responsive, event-driven applications by modeling data as streams of events. In the context of Angular, RxJS (Reactive Extensions for JavaScript) is a powerful library that enables effective reactive programming. By embracing RxJS, developers can handle asynchronous operations, event streams, and complex data flows with ease. RxJS provides a wide range of operators that empower developers to transform, combine, and filter data streams, resulting in cleaner and more maintainable code. In this section, we will explore the fundamentals of reactive programming and introduce RxJS as the go-to library for leveraging its benefits in Angular development.

Understanding Observables and Observers

Observables are a core concept in RxJS and serve as the building blocks for reactive programming in Angular. An Observable represents a stream of data that can emit values over time. It can emit any number of values, including zero, one, or multiple values. Think of an Observable as a pipeline through which data flows, and each emitted value is an event in the stream.

Observers, on the other hand, are entities that subscribe to Observables in order to receive and handle the emitted values. Observers listen for events emitted by an Observable and react accordingly. When an Observer subscribes to an Observable, it establishes a connection between the two, enabling the Observer to receive data as it becomes available.

This subscription model allows for asynchronous and event-driven programming. Asynchronous operations, such as API calls or user input, can be encapsulated within an Observable. When the result of the asynchronous operation is ready, the Observable emits the value to its subscribed Observers. This enables developers to handle asynchronous tasks in a more structured and manageable manner.

Furthermore, Observables are well-suited for event-driven scenarios. Events, such as button clicks or mouse movements, can be transformed into Observables. Observers can then subscribe to these Observables to react to the events in a reactive and declarative way.

By understanding the concept of Observables and the role of Observers, developers can leverage this powerful combination to create more responsive and flexible code. As we delve deeper into RxJS, we’ll explore how to work with Observables and Observers in practice, applying various operators to manipulate data streams and unleash the full potential of reactive programming in Angular.

Core Concepts of RxJS

1) Key Concepts of RxJS:

RxJS introduces several core concepts that are essential to understanding and effectively using the library. These concepts include operators, streams, subscriptions, and subjects.

Operators: RxJS provides a rich set of operators that allow developers to transform, filter, combine, and manipulate data streams emitted by Observables. Operators enable powerful data stream transformations and help in composing complex asynchronous workflows.

Streams: In RxJS, a stream refers to a sequence of values emitted over time by an Observable. Streams can represent various data sources, such as user events, HTTP responses, or timers. Observables emit values, and these emitted values form the data stream.

Subscriptions: Subscriptions are the connection between Observables and Observers. When an Observer subscribes to an Observable, a subscription is created. Subscriptions allow Observers to receive and handle the emitted values from the Observable. Subscriptions can also be used to unsubscribe from an Observable to stop receiving further values.

Subjects: Subjects are special types of Observables that act as both Observables and Observers. They allow values to be multicasted to multiple Observers, making them useful for sharing and broadcasting data within an application.

2) Operators and Data Stream Transformation:

Operators play a crucial role in RxJS as they enable the transformation, filtering, and combination of data streams emitted by Observables. Operators can be categorized into various types, such as transformation operators (e.g., map, pluck), filtering operators (e.g., filter, take), combination operators (e.g., merge, concat), and many more. These operators allow developers to manipulate the emitted values, apply calculations, perform filtering based on specific criteria, and combine multiple data streams into a single stream.

3) Common Operators Used in Angular Development:

In Angular development, certain operators are commonly used to handle data streams efficiently. These operators include:

map: Transforms the values emitted by an Observable by applying a mapping function to each value, producing a new value stream.

filter: Filters the values emitted by an Observable based on a provided predicate function, allowing only the values that satisfy the condition to pass through.

merge: Combines multiple Observables into a single Observable, emitting values from all source Observables as they arrive.

switchMap: Transforms each value emitted by an Observable into a new Observable. It then subscribes to the new Observable and emits the values from the most recent inner Observable.

These operators, among others available in RxJS, empower Angular developers to manipulate and transform data streams effectively, making it easier to handle asynchronous operations, perform data manipulations, and create dynamic and responsive applications.

Understanding these core concepts and leveraging the power of operators will enable developers to harness the full potential of RxJS and build reactive Angular applications with ease and efficiency.

Managing Asynchronous Operations with RxJS

Simplifying Asynchronous Operations:

RxJS simplifies the management of asynchronous operations, including handling API calls and promises. Traditionally, working with asynchronous tasks in JavaScript involved using callbacks or promises, which could lead to callback hell or nested promise chains. RxJS offers a more streamlined approach by encapsulating asynchronous operations within Observables. Observables can emit values over time, making them ideal for handling asynchronous tasks in a reactive manner.

Handling HTTP Requests with RxJS Operators:

RxJS provides powerful operators that facilitate handling HTTP requests. Examples of such operators include mergeMap, switchMap, and concatMap. These operators are used to transform values emitted by an Observable into new Observables, allowing for the seamless management of HTTP requests.

mergeMap: It combines the values emitted by an Observable into a single stream, making it suitable for scenarios where multiple HTTP requests need to be made concurrently.

switchMap: It cancels the previous inner Observable and switches to a new one whenever a new value is emitted by the source Observable. This is useful when dealing with scenarios like typeahead search, where you want to cancel previous HTTP requests and only consider the latest one.

concatMap: It maintains the order of emitted values and processes each inner Observable sequentially. This is helpful when preserving the order of HTTP requests is important.

By using these operators, developers can effectively manage and coordinate multiple HTTP requests, handle response mapping, and compose complex data flows.

Error Handling and Retry Mechanisms:

Error handling is an important aspect of asynchronous operations. RxJS provides operators like catchError and retry to handle errors gracefully.

catchError: This operator intercepts errors that occur within an Observable and allows developers to handle them in a controlled manner. It can be used to perform fallback actions, return default values, or transform the error into a new Observable.

retry: This operator enables automatic retry of failed Observable sequences. It allows developers to specify the number of retry attempts or use conditions to determine whether a retry should be attempted. This can be useful in scenarios where temporary network errors or transient issues might occur.

By employing these error handling and retry mechanisms, developers can enhance the robustness and reliability of their applications when dealing with asynchronous operations.

RxJS simplifies the management of asynchronous operations in Angular applications. It provides powerful operators for handling HTTP requests, error handling, and retrying mechanisms. By leveraging these features, developers can write cleaner, more readable code and build responsive applications that gracefully handle asynchronous tasks.

RxJS for Real Enterprise Use Cases: A Practical Course for Angular Developers

If you’ve worked on real Angular applications, you already know this truth:

Most production problems are not about “how to use an operator”…

They’re about handling complex async flows reliably.

That’s exactly why I built my new course:

RxJS for Real Enterprise Use Cases

This course is designed for developers who want to move beyond basic RxJS tutorials and start building
enterprise-grade Angular features—features that handle performance, real-time updates,
workflow orchestration, and system reliability.


Why This Course Exists

RxJS is one of the most powerful tools in Angular—but it’s also one of the most misunderstood.

Most learning material focuses on isolated operators like:

  • map
  • filter
  • switchMap

But in real projects, you’re solving problems like:

  • Preventing unnecessary API calls
  • Handling race conditions and slow backends
  • Building dependent and multi-step workflows
  • Managing real-time streams from WebSockets
  • Making polling smarter with auto stop conditions
  • Avoiding notification spam with buffering

This course focuses on exactly those problems.


What You’ll Build in This Course

This is not a slide-only course. Every section includes practical examples you can run locally.

Section 2: High-Performance Search Systems

You’ll build search systems that behave like real enterprise apps:

  • Live search with debounceTime + distinctUntilChanged
  • Smart request handling using switchMap
  • Caching results for faster UI and fewer API calls
  • Handling slow APIs using timeouts and fallback strategies

Section 3: Workflow Orchestration

This is where RxJS becomes truly powerful.

You’ll learn how to coordinate real workflows like:

  • Dependent API calls using switchMap (Logistics use case)
  • Multi-step orchestration using mergeMap + forkJoin (Manufacturing use case)
  • Travel booking workflow with:
    • cancellation using takeUntil
    • retries using retry
    • preventing duplicate submissions using exhaustMap

Section 4: Real-Time Systems

Modern applications are real-time by default.

You’ll build features like:

  • Real-time dashboards using WebSockets (multiple data providers)
  • Live notification systems using batching with bufferTime
  • Intelligent polling using interval + stop conditions with takeWhile

Who This Course Is For

This course is perfect if you are:

  • An Angular developer using RxJS daily
  • Struggling with race conditions and API over-calling
  • Building real-time dashboards or notification systems
  • Working in enterprise projects and want production patterns
  • Preparing for senior-level Angular interviews

What Makes This Course Different?

Here’s what I focused on while building this course:

Enterprise-first approach

The examples are inspired by real product problems: search, workflows, dashboards, and streams.

Clean, structured code

Every example is written in a clean and teachable way, so you can directly apply it in your own project.

Short lectures with strong demos

Instead of long theory-heavy videos, each lecture explains the core idea quickly and then demonstrates it clearly.

Includes source code

You get full source code, and you can run everything locally with simple setup steps.


Final Thought: RxJS Isn’t Hard—Unreliable Async Code Is

The biggest challenge in frontend development is not writing code.

It’s writing predictable code that behaves correctly when:

  • APIs are slow
  • users click multiple times
  • networks fail
  • events come too fast
  • real-time streams never stop

That’s what this course teaches.


Enroll Now

If you’re ready to level up your RxJS skills and start building production-ready systems confidently, this course is for you:

RxJS for Real Enterprise Use Cases

From 100KG (Kilograms) to a Healthier Me: My 25KG Weight Loss Journey

Over the past few months, people have started noticing the changes and often ask me, “What’s the secret?” Well, here it is!

Almost 15 months ago, I was at 100KG (Kilograms), feeling sluggish and unhealthy. I knew I had to make a change, not just to look better but to feel better. Today, I’m 25KG lighter (that’s about 55 pounds!), and the difference is life-changing!

What Worked for Me:

  • Eating When Hungry – Instead of following strict meal schedules, I simply listened to my body and avoided unnecessary eating.-
  • No Junk Food – Cutting out processed and unhealthy foods made a huge impact.
  • Balanced Approach – I stayed disciplined on weekdays but ate well over the weekends, ensuring I enjoyed my meals without overindulging.
  • Minimal Exercise – I wasn’t hitting the gym daily, but I did go a few times a month. My results came mostly from better eating habits.
  • Understanding the Science – The TED Talk “The Mathematics of Weight Loss” helped me grasp how weight loss really works.

The Impact:

  • More energy and better focus
  • Improved sleep and overall well-being
  • A renewed sense of confidence and positivity

This journey wasn’t about extreme diets or intense workouts, it was about making sustainable, long-term changes. If you’re thinking about starting your own journey, remember: small changes lead to big results!

Using combineLatest in Angular to perform multiple HTTP requests but don’t wait until all done.

In a previous post we have seen how the forkJoin operator is used to group multiple http requests (basically group observables) and take action only when all the requests have returned, i.e, we are waiting until all the http calls are finished.

But, what if we do not want to wait until all are done?, we only need to wait until atleast one http request has completed, in other words, emit value every time any of the source Observables emit after they’ve emitted at least once.

This scenario makes sense when we know certain http requests might take longer time than others, but still take actions based on other returned responses. For this use-case we use combineLatest.

Let’s look at an example to illustrate how combineLatest can be used in this scenario.

import { HttpClient } from '@angular/common/http';
import { Component, OnInit } from '@angular/core';
import { combineLatest } from 'rxjs';

@Component({
  selector: 'app-example',
  template: `
    <div>
      <p>Data 1: {{ data1 }}</p>
      <p>Data 2: {{ data2 }}</p>
      <p>Data 3: {{ data3 }}</p>
    </div>
  `
})
export class ExampleComponent implements OnInit {
  data1: any;
  data2: any;
  data3: any;

  constructor(private http: HttpClient) {}

  ngOnInit() {
    const request1 = this.http.get('https://api.example.com/data1');
    const request2 = this.http.get('https://api.example.com/data2');
    const request3 = this.http.get('https://api.example.com/data3');

    // Using combineLatest to emit when any request returns a value after all have emitted at least once
    combineLatest([request1, request2, request3]).subscribe(
      ([res1, res2, res3]) => {
        // Update the component with new data whenever any observable emits after initial emission
        this.data1 = res1;
        this.data2 = res2;
        this.data3 = res3;

        // You can also implement logic to handle responses individually here
        console.log('Responses received:', res1, res2, res3);
      }
    );
  }
}

Key points:

  • combineLatest emits a new value whenever any of the source observables emit after all previous observables have emitted at least once.
  • This makes it suitable for scenarios where you want to react to each individual HTTP response as it arrives, without waiting for all to complete.
  • Keep in mind, combineLatest requires all source observables to emit at least once before starting to emit combined values.

When to use combineLatest?

  • When responses are independent and you want to process each as they arrive.
  • When the order of responses doesn’t strictly matter.
  • When some requests might take longer, but you want to update the UI or perform actions based on any response as soon as it arrives.

Summary

In situations where you need real-time updates or partial data from multiple HTTP requests, combineLatest is a powerful operator. Unlike forkJoin, which waits for all observables to complete, combineLatest provides a continuous stream of combined data, making your application more responsive.

Understanding the Basics of TypeScript: A Guide for JavaScript Developers

JavaScript has long been the language of the web, powering everything from simple animations to complex web applications. However, as applications grow in complexity, JavaScript’s dynamic nature can sometimes become a challenge. That’s where TypeScript comes in—a statically typed superset of JavaScript that offers improved tooling, better error checking, and scalable development.

In this guide, we’ll walk through the basics of TypeScript, tailored specifically for JavaScript developers looking to level up.

🔹 What is TypeScript?

TypeScript is an open-source programming language developed by Microsoft. It builds on JavaScript by adding static type definitions. TypeScript code is eventually compiled down to plain JavaScript, making it compatible with any JavaScript environment.

🔹 Why Use TypeScript?

If you’re comfortable with JavaScript, you might wonder why you should bother with TypeScript. Here are a few compelling reasons:

  • Static Typing: Catch type-related errors at compile time.
  • Better IDE Support: Enjoy features like auto-completion, type inference, and inline documentation.
  • Improved Readability & Maintainability: Explicit types make your code easier to understand.
  • Scalability: Ideal for large projects and teams.

🔹 Getting Started with TypeScript

1. Installation

npm install -g typescript

To compile a .ts file to JavaScript:

tsc filename.ts

2. Basic Types

let isActive: boolean = true;
let count: number = 42;
let userName: string = "John";
let ids: number[] = [1, 2, 3];
let anyValue: any = "Could be anything";

3. Functions with Types

function greet(name: string): string {
  return `Hello, ${name}`;
}

Optional and default parameters:

function greet(name: string = "Guest"): string {
  return `Hello, ${name}`;
}

4. Interfaces

interface User {
  id: number;
  name: string;
}

let user: User = {
  id: 1,
  name: "Alice"
};

5. Classes and Inheritance

class Animal {
  constructor(public name: string) {}

  speak(): void {
    console.log(`${this.name} makes a sound.`);
  }
}

class Dog extends Animal {
  speak(): void {
    console.log(`${this.name} barks.`);
  }
}

🔹 TypeScript vs JavaScript: Key Differences

Feature JavaScript TypeScript
Typing Dynamic Static (optional)
Compile-time Checks No Yes
Interfaces No Yes
Tooling Basic Advanced

🔹 Tips for JavaScript Developers Transitioning to TypeScript

  • Start Small: Begin by adding TypeScript to just one file in your project.
  • Use tsc --init: To create a tsconfig.json and configure your project.
  • Gradually Add Types: Use the any type as a temporary fallback and slowly introduce strict typing.
  • Use DefinitelyTyped: For type definitions of popular JavaScript libraries (@types/library-name).

🔹 Final Thoughts

TypeScript doesn’t replace JavaScript—it enhances it. By introducing types and better tooling, TypeScript helps developers write more predictable, maintainable, and robust code. For JavaScript developers, learning TypeScript is a natural next step that can significantly boost your productivity and code quality.

📌 Ready to Dive In?

If you haven’t tried TypeScript yet, now is a great time to start. The learning curve is gentle, especially with your JavaScript background, and the benefits become obvious quickly as your projects scale.

🌐 Useful External Resources

For more in-depth information, check out these trusted resources:

Top JavaScript Libraries and Frameworks for Web Development in 2025

Web development continues to evolve rapidly, and JavaScript remains at the heart of building modern, responsive, and feature-rich applications. As we move into 2025, the JavaScript ecosystem offers more powerful tools than ever—ranging from libraries for UI components to full-stack frameworks for scalable applications.

In this post, we explore the top JavaScript libraries and frameworks leading the way in 2025 to help developers choose the best fit for their next web project.


🔥 1. React (Meta)

Why it’s still a top choice:

  • Component-based architecture and vast ecosystem
  • Powerful new features like React Server Components and concurrent rendering
  • Backed by Meta and supported by a large developer community

Use case: SPAs, PWAs, dashboards, and enterprise applications

🚀 2. Next.js (Vercel)

Why it’s essential in 2025:

  • Full-stack React framework with SSR, SSG, and API routes
  • Edge-ready with React Server Components and AI integration

Use case: SEO-friendly websites, e-commerce, and SaaS platforms

🌱 3. Vue.js 3 & Nuxt 3

Why Vue continues to rise:

  • Vue 3’s Composition API makes large apps easier to scale
  • Simple learning curve and great documentation
  • Nuxt 3 supports SSR, static generation, and full-stack capabilities

Use case: Admin panels, PWAs, and mid-size apps

⚡ 4. Svelte & SvelteKit

Why it stands out in 2025:

  • Compiles code at build time, resulting in smaller bundles
  • SvelteKit provides routing, SSR, and API handling out-of-the-box

Use case: Lightweight apps, startup MVPs, and interactive dashboards

🌐 5. Astro

The new favorite for content-driven sites:

  • “Islands architecture” loads JavaScript only when needed
  • Supports multiple frameworks like React, Vue, Svelte in one project

Use case: Blogs, docs, and marketing websites

🛠️ 6. Angular (Google)

Why Angular is still relevant:

  • All-in-one solution with built-in routing, forms, and state management
  • Improved performance and developer experience in Angular 17+

Use case: Large-scale enterprise apps and complex admin dashboards

⚙️ 7. Qwik

The performance powerhouse:

  • Uses “resumability” to achieve near-instant loading
  • Ideal for sites targeting excellent Core Web Vitals scores

Use case: High-performance sites, e-commerce, and SEO-critical apps

🧩 8. Lit (Web Components)

Embracing the Web Components standard:

  • Builds fast, standard-based UI components with minimal code
  • Great for design systems and reusable component libraries

Use case: Micro frontends, design systems, and cross-framework projects

📊 Honorable Mentions

  • Remix: Full-stack React framework with a focus on user experience
  • SolidJS: Fast, fine-grained reactive framework with a React-like syntax
  • Turso: Edge-first SQL database with JS SDK (not a framework but a growing trend)

🧠 Choosing the Right Tool

The ideal framework depends on your project needs:

  • SEO-focused: Next.js, Astro, or Qwik
  • Simplicity & performance: Svelte or SolidJS
  • Enterprise apps: Angular or React
  • Modern architecture: Qwik, Astro, or Remix

🚀 Final Thoughts

JavaScript frameworks are evolving faster than ever, and 2025 is full of promising tools for every kind of web project. Whether you’re building at the edge, optimizing for SEO, or scaling an enterprise-grade app, there’s a JavaScript solution that fits your needs.

Stay curious, experiment boldly, and keep coding! 💻✨

Create HTTP Observable from Fetch in Angular

Angular is a popular front-end framework for building web applications. One of the essential aspects of web development is making HTTP requests to fetch data from a server or send data to it. Angular provides a powerful HttpClient module for this purpose, but you can also use the Fetch API to create HTTP observables. In this blog post, we will explore how to create HTTP observables from the Fetch API in Angular.

Understanding HTTP Observables

Before we dive into the details of creating HTTP observables from the Fetch API, let’s briefly understand what HTTP observables are. In Angular, HTTP observables are used to manage asynchronous HTTP requests. They are a crucial part of modern web development, as they allow us to work with data from APIs, servers, or other sources asynchronously.

Angular provides an HttpClient module that simplifies making HTTP requests. However, the Fetch API is another way to perform HTTP requests in a more low-level manner.

Using the Fetch API

The Fetch API is a modern web API for making network requests. It provides a cleaner and more modern alternative to the older XMLHttpRequest. To use the Fetch API in Angular, follow these steps:

Step 1: Import the Required Modules

First, you need to import the Observable class and other necessary modules. In your Angular component, include the following imports:

import { Observable, from } from 'rxjs';
import { map } from 'rxjs/operators';

Step 2: Create an HTTP Observable with Fetch

Now, you can create an HTTP Observable using the Fetch API. Here’s an example of how to fetch data from an API and convert it into an Observable:

const url = 'https://api.example.com/data';

const fetchData = () => {
  return from(fetch(url))
    .pipe(
      map(response => {
        if (!response.ok) {
          throw new Error('Network response was not ok');
        }
        return response.json();
      })
    );
};

const dataObservable: Observable<any> = fetchData();

In this code, we use the fetch function to make an HTTP request and then use the from operator from RxJS to convert the Promise returned by fetch into an Observable. We also use the map operator to handle the response and convert it to JSON.

Step 3: Subscribe and Handle the Data

To consume the data from the created Observable, you can subscribe to it in your Angular component:

dataObservable.subscribe(data => {
  console.log('Received data:', data);
}, error => {
  console.error('An error occurred:', error);
});

This code subscribes to the dataObservable and logs the received data or any errors that occur during the HTTP request.

Create Http Observables

Now, that we understand how to use Fetch API with observables. Let’s create a utility (re-usable) function which creates Http Observables when needed.

import { Observable } from 'rxjs';

// Below function makes use of create method to create an Observable
export function createHttpObservable(url: string): Observable<any> {
    return  Observable.create(observer => {

      // AbortController for cancelling our subscriptions when needed.
      const controller = new AbortController();
      const signal = controller.signal;

      fetch(url, {signal})
        .then(response => {
          return response.json();
        })
        .then(body => {
          observer.next(body);
          observer.complete();
        })
        .catch(err => {
          observer.error(err);
        });

        return () => controller.abort();
    });
  }

Use the utility function like below:

this.myData$ = createHttpObservable('api/dataItems');
Benefits of Using Fetch with Observables

Using the Fetch API with Observables in Angular offers several advantages:

  • Flexibility: The Fetch API provides a simple and flexible way to make HTTP requests, allowing you to customize the request headers and other options.
  • Observables: By converting the Fetch API’s Promise into an Observable, you can leverage RxJS operators to work with the asynchronous data flow effectively.
  • Error Handling: You can easily handle errors using RxJS operators like catchError, making your code more robust.
  • Interoperability: Fetch works well with other web APIs and libraries, so you can integrate it with various third-party services seamlessly.
Conclusion

While Angular’s HttpClient module is a powerful tool for making HTTP requests, the Fetch API offers an alternative approach for those who prefer a more low-level control over their requests. By converting Fetch API responses into HTTP observables, you can leverage the power of RxJS operators for efficient data handling in your Angular applications.

Remember that the choice between HttpClient and Fetch API depends on your specific use case and requirements. Both are valid options, and you should choose the one that best fits your project’s needs.

Happy coding!

Understanding RxJS Operators: concatMap, mergeMap, and exhaustMap

RxJS, or Reactive Extensions for JavaScript, is a powerful library for working with asynchronous data streams in JavaScript. It provides a wide range of operators that enable developers to manage and manipulate data flows effectively. Among these operators, concatMap, mergeMap, and exhaustMap are commonly used for transforming and managing observable sequences. In this blog post, we’ll delve into these operators, exploring their differences and use cases.

ConcatMap

ConcatMap is an RxJS operator that transforms each item emitted by an observable into a new observable, and then it concatenates these inner observables, one after the other. This means that it processes items sequentially, ensuring that the order of emitted values is preserved.

Use Case:
ConcatMap is useful when you want to maintain a strict order of operations. For example, when making a series of HTTP requests and it’s important to process the responses in the same order they were initiated, concatMap is a suitable choice.

const source = from([1, 2, 3]);
source.pipe(
  concatMap(value => of(value).pipe(delay(1000)))
).subscribe(result => console.log(result));
MergeMap

MergeMap, on the other hand, transforms each item emitted by an observable into a new observable, and then it merges these inner observables concurrently. This means that items are processed independently, and the order of their emissions may not be preserved.

Use Case:
MergeMap is handy when order doesn’t matter, and you want to process multiple tasks concurrently, such as making multiple API calls simultaneously.

const source = from([1, 2, 3]);
source.pipe(
  mergeMap(value => of(value).pipe(delay(1000)))
).subscribe(result => console.log(result));
ExhaustMap

ExhaustMap, similar to mergeMap, transforms each item emitted by an observable into a new observable. However, it only allows the inner observable from the latest item to be processed, and it ignores any new items emitted by the source observable until the inner observable completes.

Use Case:
ExhaustMap is useful when you want to prevent concurrent requests or actions and ensure that only one operation is in progress at any given time. For example, handling user clicks on a button to prevent multiple submissions.

const source = from([1, 2, 3]);
source.pipe(
  exhaustMap(value => of(value).pipe(delay(1000)))
).subscribe(result => console.log(result));

In conclusion, RxJS operators like concatMap, mergeMap, and exhaustMap offer powerful tools for working with asynchronous data streams. Your choice of operator depends on the specific requirements of your application. Understanding the differences between these operators and their use cases can greatly enhance your ability to manage and manipulate observables effectively in your JavaScript applications.

Create a custom RxJS Operator – Debug Operator

Sometimes in reactive programming its difficult to understand logic or code when we are using multiple operators, it’s not always easy to read through the observable chain, so in order to better understand the program and to troubleshoot the code we often use the tap operator to log statements to the console.

For example: Say, we have a search input on the page and we want to look at the search values user is inputting. For this, we certainly use the tap operator to log the search string right?. See below.

fromEvent<any>(this.input.nativeElement, 'keyup')
        .pipe(
            tap(search => console.log('search input:', search))
        );

This is fine, but, what if we want to log different statement?, we are going to use the tap operator again, and again maybe on other observables!!. This is not very productive and impossible to scale.

For this purpose we can actually create a custom operator to log statements to the console and also do much more. See below.

export const debug = (message: string) => 
    (source: Observable<any>) => source
        .pipe(
            tap(val => {
                console.log(message + ': ', val);
            }));

Here, we have created a custom operator called debug and it simply logs the message and value.

This operator can also be easily scaled to take different log levels and log statements accordingly, i.e, conditionally output the message depending on the logging level. See below.

// Define the logging levels
export enum LoggingLevel {
    INFO,
    DEBUG,
    ERROR
}

// log the message based on the logging level
export const debug = (level: number, message: string) => 
    (source: Observable<any>) => source
        .pipe(
            tap(val => {
                if (level === LoggingLevel.INFO) {
                    console.log(message + ': ', val);
                } else if (level === LoggingLevel.DEBUG) {
                    console.warn(message + ': ', val);
                } else if (level === LoggingLevel.ERROR) {
                    console.error(message + ': ', val);
                }
            }));

Here, we have defined multiple logging levels and for each log level we are logging different type of statement to the console.

Finally apply the debug operator on the input search. See below.

fromEvent<any>(this.input.nativeElement, 'keyup')
        .pipe(
            // For console.log
            debug(LoggingLevel.INFO, 'search'),
            // For console.warn
            debug(LoggingLevel.DEBUG, 'warning'),
            // For console.error
            debug(LoggingLevel.ERROR, 'error'),
        );

Now, as you type in the input search you should see the logging statements on the console, like below.

Our custom RxJS debug operator is working!!.