For developer working with JavaScript and Node.js, you may find it necessary to use different versions of Node.js for different projects. This is where nvm (Node Version Manager) comes in handy. nvm is a command-line tool that allows you to easily install and manage multiple versions of Node.js on your system.
In this tutorial, we’ll see how to install nvm and use it to install different versions of Node.js on a Mac.
Step 1: Install Homebrew
Homebrew is a popular package manager for macOS. It allows you to easily install, update, and manage software packages on your Mac. To install Homebrew, open Terminal and enter the following command:
/usr/bin/ruby -e "$(curl -fsSL https://raw.githubusercontent.com/Homebrew/install/master/install)"
**If Homebrew is already installed then you may want to update it:
// First Check the state of the tool first, because if there are any issues its best to fix them
brew doctor

// Now update
brew update
Step 2: Install nvm
With Homebrew installed and updated, you can use it to install nvm. Enter the following command in Terminal:
brew install nvm
This will install nvm on your system.
Step 3: Configure nvm
Once nvm is installed, you’ll need to configure it by adding the following lines to your shell profile (e.g. ~/.bash_profile, ~/.zshrc, or ~/.profile):
export NVM_DIR="$HOME/.nvm"
[ -s "$(brew --prefix)/opt/nvm/nvm.sh" ] && . "$(brew --prefix)/opt/nvm/nvm.sh"
Save the changes to your shell profile and reload it with the following command:
source ~/.bash_profile
Note: If you’re using a different shell, replace ~/.bash_profile with the appropriate file for your shell.
Step 4: Install a version of Node.js
Now that nvm is installed and configured, you can use it to install a specific version of Node.js. To do so, enter the following command in Terminal:
nvm install <version>
Replace with the version of Node.js you want to install (e.g. 14.17.6).
Step 5: Use a version of Node.js
To use a specific version of Node.js, simply enter the following command in Terminal:
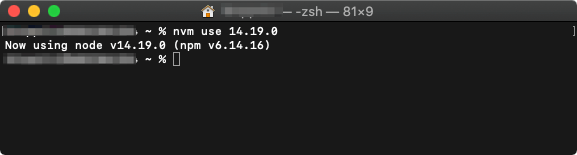
nvm use <version>
Replace with the version of Node.js you want to use. See below screenshot.
You can confirm that the correct version of Node.js is being used by entering the following command:
node -v
This will output the version of Node.js that is currently being used. See below screenshot.

Step 6: Install global npm packages
If you need to install global npm packages, you’ll need to do so for each version of Node.js you have installed. To do so, use the following command:
nvm use <version> && npm install -g <package>
Replace with the version of Node.js you want to install the package for, and with the name of the package you want to install.
And that’s it! With nvm installed and configured, you can easily install and manage multiple versions of Node.js on your Mac.
Few tips:
1) How to get the available node versions?.
To List all the available versions of node you can use below command.
nvm ls-remote
Below screenshot shows all the node versions…

2) How to check the installed node versions?.
To check the installed node versions you can use below command.
nvm ls
Below screenshot shows all the installed node version on Mac and also points to the currently selected node, here it’s v14.19.0.

Checkout official website for more info.
